Wedding shoes are the most significance choice which as a bride you will have to make after choosing your bridal attire and gown. It is vital that your shoes complement your gown and, like your dress, are ideal in every way. To select the right bridal shoe for the wedding day, you will have many things to consider. This includes the comfort, types of heel, materials used, colours etc.
When choosing the wedding shoes, I found that the designer footwear even though looks incredible yet they were very expensive. I was quite stunned by a pair of high-end designer shoes that I had seen in the store. They were pretty much the most dazzling, extremely stunning shoes I have ever seen. But the only thing that was big drawback for me was the price of the footwear as it was very much expensive.
This is when I thought of applying Rhinestone/Swarovski Crystal onto shoes on my own as this way I can cut down on the cost yet I can look perfect on my wedding day. I purchased a pair of satin wedges which was quite cost-effective.
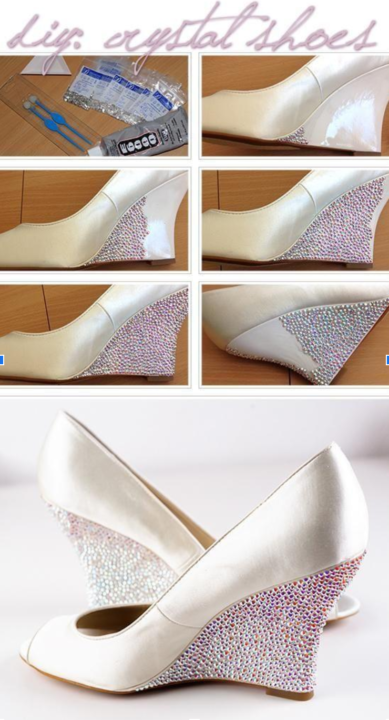
How to apply Rhinestone/Swarovski Crystals on shoes?
In order to DIY bridal footwear, you will require the following things such as:
- A Pair of shoes
- Rhinestones/Flatback Crystals [approximately 15-40 gross (1gross=144 rhinestones), based on size of crystals/area to cover]
- Tray (to keep the crystals)
- Adhesive
- Plastic Stick
- Tweezers
After you have arranged for all the above mentioned things, it’s time to follow the guide:
- In the first step, you should clean the surface of the shoe which you want to cover.
- Then you will have to decide on which pattern you want to choose, random or uniformity pattern? I personally prefer the appearance of various sizes randomly placed, and this why I did. On the other hand, in case you want a more consistent look, you might want to apply line by line, instead of to a small area.
- You can begin from the back of the heel or the edge of the shoe. I believed that the area which needed real precision was the top and bottom edges. I used different sizes to create those borders, but you can select one stone to make it simpler for uniformity.
- To place the stones, you will have to apply a thin layer of adhesive to an extremely small area. The adhesive sets quick enough; therefore, you should place the stones prior to it would lose its stickiness. You can try to press on around the stones here and there for a moment after it loses that tackiness; however, applying the stones is so much easier when the adhesive is more viscous.
- In order to pick up stone and place onto glue, you can use tweezers. The most excellent method is to let go of the rhinestone just prior to it touched the glue, which would prevent getting glue on the tweezers. Even if you get some adhesive on the tweezers, do not worry as it is quite easy to get rid of such glue. You can simply rub it off.
- To press rhinestone into the right area, use plastic stick or tweezers. I sought after a complete tight pattern, so I utilised a plastic stick to ensure that the rhinestones are as close as I can.
- Allow the stones to set for at least one day to three days.
- You should clean-up of any excess or residual glue which can be done using acetone or rubbing alcohol. I recommend doing it on a little loose, additional stones to ensure there are no adverse reactions. Do not saturate the area you are working on, as it will melt the adhesive below the stone, too.
These are some of the steps that I followed in order to make my bridal footwear look extraordinary.
The entire process is not essentially an inexpensive or fast project, but it is much affordable than most other designer rhinestone-bedecked shoes, though. If the process seems a hard task, you can explore an amazing wedding shoes collection at JJ’s House – one of the finest online retailers selling wedding dresses and accessories globally at affordable prices.