Kids love to explore and learn about the world around them, and there’s something special about engaging in hands-on science experiments. A rain cloud in a jar is a simple yet fascinating way to teach children about weather patterns. This activity uses basic household items to simulate how clouds form and produce rain, making it a perfect choice for a fun and educational afternoon.
With a step-by-step process, children can watch in amazement as drops of colored water seep through a fluffy layer of shaving cream, mimicking the process of rain falling from the sky. This experiment sparks curiosity and also provides an excellent opportunity for parents and teachers to discuss how clouds and rainstorms work.
Parents can easily set up this activity using common items, and printable recording sheets are available to make the experiment even more interactive and educational. By the end of the session, your kids will have had a great time while gaining a deeper appreciation for the science behind the weather.
Materials
Essential Items
- 8 oz Plastic Mason Jar: A small, clear plastic Mason jar works well. If you prefer, use an 8 oz clear drinking glass instead.
- Shaving Cream: Opt for “sensitive skin” or “unscented” shaving cream. This ensures a safe and pleasant experience for children.
- Food Coloring: Use liquid food coloring, diluted in small bowls or cups of water. Alternatively, liquid watercolor paints can also be used.
- Pipettes: Essential for extracting and dispensing the colored water over the shaving cream.
- Art Tray: An art tray helps contain the materials and makes cleaning up easier.
Optional Items
- Spouted Liquid Measuring Cup: Measure accurately and pour water into the jar or glass.
- Spoons for Mixing: Ideal for stirring the diluted food coloring.
- Paintbrushes and Cardstock: Great for spreading shaving cream and creating art after the experiment.
Setup
- Preparing the Jar: Fill the Mason jar or clear drinking glass with water, leaving about half an inch from the rim. Using a spouted liquid measuring cup can make this step easier and help children practice measurement skills.
- Creating the Cloud: Squirt a large dollop of shaving cream on top of the water in the jar. Aim for a pillowy layer of about 1-2 inches thick. This will mimic a cloud in the experiment.
- Diluting the Food Coloring: In small bowls or cups, mix food coloring with a small amount of water. This will create the “rain” for the experiment.
Experiment and Play
- Using Pipettes: Children use pipettes to suck up the colored water and gently squeeze it over the top of the shaving cream cloud. This mimics how rain falls from clouds.
- Observing the Rainfall: Encourage children to watch how the colors slowly trickle through the shaving cream and fall into the water below. This visual representation helps them understand how rain works in real life.
- Asking Questions: Prompt children to describe what they see. Ask if the colored “rain” is moving quickly or slowly. Discuss which materials stay at the top and which sink to the bottom.
- Exploring Further: Introduce spoons to mix the colored water. Let children scoop and spread the shaving cream on cardstock, turning the activity into a sensory experience. Note that food coloring might temporarily stain hands and permanently stain clothing, so supervise carefully.
Additional Steps
- Painting and Sensory Play: Mixing colorful shaving cream with paintbrushes on cardstock adds an artistic element to the activity. Children can paint and create their own designs.
- Rinsing and Repeating: Once finished, rinse out the jar and repeat the steps to extend the learning and fun.
Key Learning Points
- Fine Motor Skills: Using pipettes strengthens the small muscles in children’s hands.
- Weather Understanding: This experiment demonstrates how rain and clouds work. The shaving cream acts as the cloud, and the food coloring represents the rain.
- Buoyancy: Shaving cream floats on water due to its lightweight, demonstrating positive buoyancy.
- Measurement Skills: Children practice measuring water and observing the effects of adding different amounts of coloring.
By gathering and using these materials, children can engage in a fun and educational activity that teaches them about weather patterns while developing their fine motor skills and understanding of basic scientific principles.
Table: Materials Overview
| Materials Needed | Purpose |
|---|---|
| 8 oz Plastic Mason Jar | Holds water and shaving cream cloud |
| Shaving Cream | Represents the cloud |
| Food Coloring | Acts as the rain |
| Pipettes | Used to dispense colored water into the cloud |
| Art Tray | Keeps materials contained and eases clean-up |
| Optional: Measuring Cup | Helps measure and pour water accurately |
| Optional: Spoons | Useful for mixing colors |
| Optional: Paintbrushes | For painting with colorful shaving cream |
| Optional: Cardstock | Serves as a canvas for art activities |
Gathering these materials sets the stage for an engaging and educational science activity that captures children’s curiosity and enhances their learning.
Create a Rain Cloud in a Jar
Preparing for the Weather Experiment
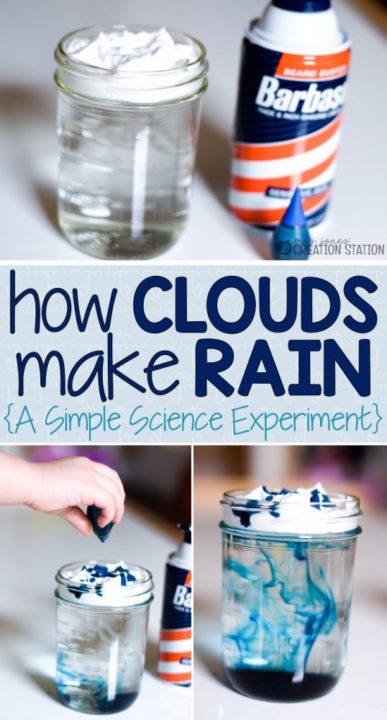
To start, you’ll need to gather your materials. In a small cup, mix together food coloring with some water. Fill a large jar about 3/4 full with water. Place the jar and the cups of colored water on a table, and put a pipette or dropper in each cup. These pipettes will help control the amount of colored water you add later.
Just before the kids are ready to begin, fill the remaining space in the jar with shaving cream, layering it slightly above the top of the jar. The shaving cream represents a cloud, which holds the “rain” made of colored water. As you drip the colored water over the shaving cream, it will eventually get heavy enough to fall through, mimicking rain.
This engaging activity offers a fun way to learn about the water cycle. Watching the colored water seep through the shaving cream helps kids visualize how real clouds hold moisture and eventually release it as rain. This hands-on experiment is perfect for both classrooms and home setups.
For a more extended learning session, repeating the experiment with different colors, such as red, blue, green, yellow, and purple, can be exciting. It’s also an excellent opportunity for fine motor practice, as kids use the pipettes to control the drops of colored water. Always conduct this rain cloud-in-a-jar experiment with adult supervision to ensure safety.
With these simple steps, you can turn a clear glass jar into a mesmerizing display of a rain cloud forming and releasing its rain. This classic weather science experiment is captivating and educates young minds about cloud formation and the water cycle.
Doing the Rain Cloud in a Jar Experiment – How It Works
Ask the kids to collect some colored water using a pipette. They will then squirt the colored water onto the shaving cream cloud. The colored water represents raindrops. After repeating this step a couple of times, they will notice how the colored water begins to seep through the shaving cream and fall into the water below. This demonstrates how rain falls from clouds when they become heavy with water droplets.
Interactive and visual, this activity helps children understand how rain forms and falls. As drops of colored water collect, the shaving cream cloud can no longer hold them. Gravity pulls the raindrops through the “air” below, just like in real weather. This experiment is simple enough for a home setting or in a classroom.
For larger groups, multiple jars and cups of colored water can be set up. Each child gets a chance to add their raindrops to the jar, enhancing the learning experience. It’s an engaging way for children to see clouds, rain, and how they interact in the atmosphere.
Check out these other neat science experiments for kids!
- 30 Science Activities for Preschoolers That Are Totally Awesome
- Growing Plants Science Activity
- Melting Snow Science Experiment
This easy science experiment is a fun way to explain how rain clouds work.
For more DIY crafts and tutorials like this, keep on visiting Sad To Happy Project, and you can also follow us on Facebook, Pinterest, Twitter
Interested in blogging or stringing your own website?? Here is the step-by-step guide on ‘How To Start Your Own Blog‘.